
If you’re searching for a chocolate dessert that’s indulgent, irresistibly creamy, and incredibly easy to make, these No-Bake Chocolate Mousse Bars are about to become your new best friend. Imagine a luscious, whipped chocolate mousse perched on a buttery, chocolatey cookie crust, all finished with a shower of chocolate shavings for that final, elegant flourish. You don’t even need to turn on the oven! These bars are perfect for parties, special occasions, or treating yourself with a little midweek magic.

Ingredients You’ll Need
The lineup for No-Bake Chocolate Mousse Bars is refreshingly simple, but each ingredient plays a critical role in delivering rich flavor, silky texture, and irresistible layers. Gather these pantry and fridge staples and prepare to be amazed at the result!
- Chocolate sandwich cookies: These create a crunchy, chocolatey crust that’s the perfect base for the creamy mousse.
- Unsalted butter: Melted butter binds the cookie crumbs together and adds richness to the crust.
- Semi-sweet chocolate: Deep, smooth chocolate flavor forms the backbone of the mousse; use good-quality chocolate for best results.
- Cocoa powder: Boosts the bar’s chocolatey intensity and gives the mousse a beautiful color.
- Powdered sugar: Helps sweeten the mousse while keeping the texture soft and smooth.
- Heavy cream: Essential for creating a light, airy mousse that still feels decadent and rich.
- Cream cheese: Adds a delightful tang and velvety texture to the mousse filling.
- Granulated sugar: Sweetens and balances the slightly bitter notes from the chocolate and cocoa.
- Vanilla extract: Rounds out the flavors and enhances the overall aroma.
- Chocolate shavings: The perfect garnish for an elegant, finished look (and a little extra chocolate never hurts!).
How to Make No-Bake Chocolate Mousse Bars
Step 1: Create the Cookie Crust
Start by crushing the chocolate sandwich cookies—either in a food processor or by sealing them in a zip-top bag and rolling over with a rolling pin until you have fine crumbs. Combine these with the melted butter in a mixing bowl, stirring until the mixture looks like wet sand. Firmly press the mixture into the bottom of a parchment-lined 9×9-inch baking dish, making sure to reach the corners for a uniform base. Pop this into the fridge to set while you work on that dreamy mousse.
Step 2: Make the Melted Chocolate Mixture
Take your chopped semi-sweet chocolate and place it in a microwave-safe bowl or set it over a double boiler. Pour in ½ cup of the heavy cream, then gently melt the mixture, stirring frequently until it’s silky and smooth. Let it cool slightly—you want it warm, not hot, so it doesn’t melt the other filling ingredients.
Step 3: Prepare the Cream Cheese Mixture
In a separate large bowl, beat the softened cream cheese, granulated sugar, and vanilla extract together until the mixture is light, creamy, and totally lump-free. Sprinkle in the cocoa powder and powdered sugar, then keep mixing until fully blended and luscious. This base mixture is sweet, tangy, and full of chocolate flavor—it’s what gives the bars their decadent bite.
Step 4: Blend the Chocolate and Cream Cheese Mixtures
Now, fold the slightly cooled melted chocolate mixture into the cream cheese base. Use a spatula and a gentle hand to combine, swirling until the two become one seamless, glossy, chocolatey batter. This step is where the mousse’s flavor and texture really start to come together in that signature No-Bake Chocolate Mousse Bars fashion.
Step 5: Whip and Fold the Cream
In a clean bowl, whip the remaining 1 cup of heavy cream until stiff peaks form. This whipped cream is the secret to an airy, mousse-like filling, so don’t skimp on the whipping! Gently fold it into the chocolate mixture, being careful not to deflate all those lovely bubbles. The result should be a cloud-like, dreamy chocolate mousse.
Step 6: Assemble and Chill
Scoop the chocolate mousse over your chilled crust and spread it evenly with a spatula, smoothing the top. Cover the pan and let it chill in the refrigerator for at least 4 hours, or until set. The hardest part is waiting, but this step guarantees clean, perfect bars with a silky texture.
Step 7: Garnish and Serve
Once set, sprinkle the bars liberally with chocolate shavings or curls for that irresistible look and crunch. Use a sharp knife to slice the bars, cleaning the blade between cuts for the neatest results. Now, enjoy!
How to Serve No-Bake Chocolate Mousse Bars

Garnishes
The No-Bake Chocolate Mousse Bars look stunning with just a scattering of chocolate shavings, but you can also get creative! Try dusting with a touch of cocoa powder, adding a few fresh raspberries, a drizzle of caramel sauce, or a dollop of whipped cream. Each garnish brings its own flair, both visually and flavor-wise.
Side Dishes
Pair these bars with a scoop of vanilla bean ice cream or a spoonful of lightly sweetened crème fraîche to balance the rich chocolate. For something a little different, a cup of bold espresso or freshly brewed coffee makes a luxurious companion, cutting through the sweetness and making each bite even more satisfying.
Creative Ways to Present
For parties or special occasions, try serving the No-Bake Chocolate Mousse Bars as part of a dessert platter with strawberries, mint leaves, and miniature meringues. Or, cut the bars into petite squares and insert festive toothpicks for bite-sized indulgence at a dessert buffet. Individual ramekins are another fun way to personalize servings for each guest.
Make Ahead and Storage
Storing Leftovers
Keep any leftover No-Bake Chocolate Mousse Bars tightly covered in the refrigerator, where they’ll stay delicious for up to 5 days. Make sure the pan is well-sealed or use an airtight container to prevent the bars from absorbing any fridge odors and to preserve their smooth texture.
Freezing
If you’d like to freeze your bars for later, simply slice them, place parchment paper between each piece, and store in an airtight container. The bars freeze beautifully for up to 2 months. Defrost in the refrigerator overnight before serving for the best texture and flavor.
Reheating
Since these are best enjoyed cold, there’s no need to reheat No-Bake Chocolate Mousse Bars! Just let them sit at room temperature for 10 to 15 minutes before serving if you prefer a softer mousse, especially when coming straight from the freezer.
FAQs
Can I use milk chocolate instead of semi-sweet chocolate?
Absolutely! Milk chocolate will bring a sweeter, creamier flavor to the mousse. Just be aware that the bars may be a touch softer, and you might want to reduce the added sugar a little to balance the extra sweetness.
What’s the best way to crush chocolate sandwich cookies?
The quickest way is pulsing them in a food processor until fine crumbs form. If you don’t have one, popping the cookies in a sturdy zip-top bag and crushing them with a rolling pin works perfectly, too!
Can I make No-Bake Chocolate Mousse Bars gluten free?
Definitely! Just swap the regular chocolate sandwich cookies for your favorite gluten-free variety. The rest of the ingredients are naturally gluten free, so you won’t miss a thing.
How can I add a flavor twist?
You can incorporate a splash of espresso or coffee liqueur into the mousse for extra depth and a grown-up flavor profile. Or, fold in chopped hazelnuts or orange zest to make the bars truly your own.
Why isn’t my mousse setting properly?
If your mousse feels too soft, it could be due to under-whipped cream or not enough chilling time. Be patient and allow a full 4 hours (or overnight) in the fridge. Using full-fat cream and cream cheese also helps ensure the perfect mousse layer.
Final Thoughts
If you’re ready to wow your family or guests with effortless elegance, give these No-Bake Chocolate Mousse Bars a try. They’re rich, silky, and chocolate-lover approved—plus, they come together in a snap without ever needing to turn on the oven. Happy indulging!
Print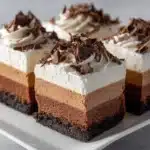
No-Bake Chocolate Mousse Bars Recipe
- Total Time: 4 hours 30 minutes (including chilling)
- Yield: 12 bars 1x
- Diet: Vegetarian
Description
Indulge in the rich and creamy delight of these decadent No-Bake Chocolate Mousse Bars. A chocolate lover’s dream, these bars are a perfect blend of a crunchy cookie crust and a velvety smooth chocolate mousse, topped with delicate chocolate shavings.
Ingredients
For the Crust:
- 24 chocolate sandwich cookies, crushed
- 6 tbsp unsalted butter, melted
For the Filling:
- 8 oz semi-sweet chocolate, chopped
- 2 tbsp cocoa powder
- 2 tbsp powdered sugar
- 1 ½ cups heavy cream, divided
- 8 oz cream cheese, softened
- ½ cup granulated sugar
- 1 tsp vanilla extract
For Garnish:
- Chocolate shavings
Instructions
- Prepare the Crust: Mix crushed chocolate sandwich cookies with melted butter. Press into the bottom of a parchment-lined 9×9-inch baking dish to form the crust. Chill.
- Make the Filling: Melt semi-sweet chocolate with ½ cup heavy cream. In a mixing bowl, beat cream cheese, sugar, and vanilla. Mix in cocoa powder and powdered sugar. Fold in the melted chocolate. Whip remaining cream and fold into the chocolate mixture.
- Assemble: Spread mousse over the crust. Chill for at least 4 hours. Garnish with chocolate shavings before serving.
Notes
- For a flavor twist, add espresso or coffee liqueur to the mousse.
- Store covered in the refrigerator for up to 5 days or freeze for longer storage.
- Prep Time: 30 minutes
- Cook Time: 0 minutes
- Category: Dessert
- Method: No-Bake
- Cuisine: American
Nutrition
- Serving Size: 1 bar
- Calories: 310
- Sugar: 22 g
- Sodium: 210 mg
- Fat: 21 g
- Saturated Fat: 12 g
- Unsaturated Fat: 8 g
- Trans Fat: 0 g
- Carbohydrates: 30 g
- Fiber: 2 g
- Protein: 4 g
- Cholesterol: 45 mg


