Bring the fun of February’s most whimsical holiday to your kitchen with these Groundhog Day Cupcakes! Moist chocolate cupcakes meet fluffy chocolate buttercream, and the cutest little groundhog faces pop up from “dirt” you can eat. Whether you’re marking the change of seasons with kids or surprising friends with a creative treat, these festive cupcakes deliver joy with every bite. The chocolatey base and playful decorations are guaranteed to steal the show at any Groundhog Day gathering.
Ingredients You’ll Need
Simple, everyday ingredients come together to make magical Groundhog Day Cupcakes. Each one plays a key role, turning classic flavors into an adorable, crowd-pleasing treat. Don’t skip on any element—every part contributes to the taste, texture, or that lovable look!
- All-purpose flour: Forms the structure for soft, fluffy cupcakes you can proudly pile high with frosting.
- Unsweetened cocoa powder: Gives the cupcakes and buttercream a deep, rich chocolate flavor that never tastes too sweet.
- Baking soda: Provides the perfect lift, ensuring your Groundhog Day Cupcakes bake up light instead of dense.
- Salt: Balances out all the sweet notes and intensifies the chocolate experience.
- Unsalted butter (softened): Creates tender cupcakes and a creamy buttercream, with none of the risk of salty aftertaste.
- Granulated sugar: Delivers pure sweetness that melds seamlessly into both the batter and frosting.
- Large eggs: Add richness and help bind everything together for a moist, springy crumb.
- Vanilla extract: Rounds out all the chocolate with warm, aromatic notes.
- Buttermilk: Ensures extra-soft cupcakes and activates the baking soda for a perfectly even rise.
- Powdered sugar: Whips up into a dreamy, fluffy buttercream frosting that’s ultra easy to pipe or spread.
- Milk: Loosens the buttercream just enough for perfect consistency—go tablespoon by tablespoon for precision.
- Crushed chocolate cookies: Sprinkle these on for the ultimate edible “dirt” effect that will wow both kids and adults.
- Mini Nilla Wafers: The cutest, ready-made groundhog heads you’ll ever see!
- Candy eyes: Because every groundhog deserves big, adorable eyes peeping out from his cupcake burrow.
- Chocolate chips: Simple ear accents that bring your little critters to life.
- Mini marshmallows: Snip them in half for instant, comical teeth that make the faces irresistible.
- Black decorating gel: Adds personality with a quick dot of a nose and a cheery smile—melted chocolate works too.
How to Make Groundhog Day Cupcakes
Step 1: Prepare Your Cupcake Liners and Oven
Begin by preheating your oven to 350°F, and line a 12-cup muffin tin with cupcake liners. This guarantees easy cleanup and ensures those cupcakes release perfectly after baking. Lining everything up at the start keeps the baking process smooth and stress-free!
Step 2: Mix the Dry Ingredients
In a medium bowl, whisk together the flour, cocoa powder, baking soda, and salt. Mixing them well at this stage helps distribute the rising agent and cocoa evenly throughout the batter, so every cupcake is perfectly light and uniformly chocolatey.
Step 3: Make the Cupcake Batter
Beat your softened butter and granulated sugar in a large bowl until it becomes light and fluffy—this is the secret to cupcakes with a delicate crumb. Add the eggs one at a time, mixing well after each, then stir in the vanilla extract for a wonderful depth of flavor. Now, alternate adding the dry ingredient mix and the buttermilk, starting and ending with the dry mix. Mix just until everything is combined; overmixing leads to dense cupcakes, so gentle hands win here.
Step 4: Bake to Perfection
Fill each cupcake liner about two-thirds full, using an ice cream scoop or large spoon for consistent sizes. Bake for 18 to 20 minutes, or until a toothpick inserted into the center comes out clean. Try not to peek too often—let the oven do its magic! Once baked, let your Groundhog Day Cupcakes cool completely before you begin decorating.
Step 5: Make the Chocolate Buttercream
Beat the softened butter until creamy, then slowly sift in the powdered sugar and cocoa powder. Add vanilla and milk, and whip until the buttercream is light, fluffy, and ready to swirl over those cooled cupcakes. Adjust the milk quantity to reach your perfect spreading or piping consistency.
Step 6: Decorate for Groundhog Day Fun
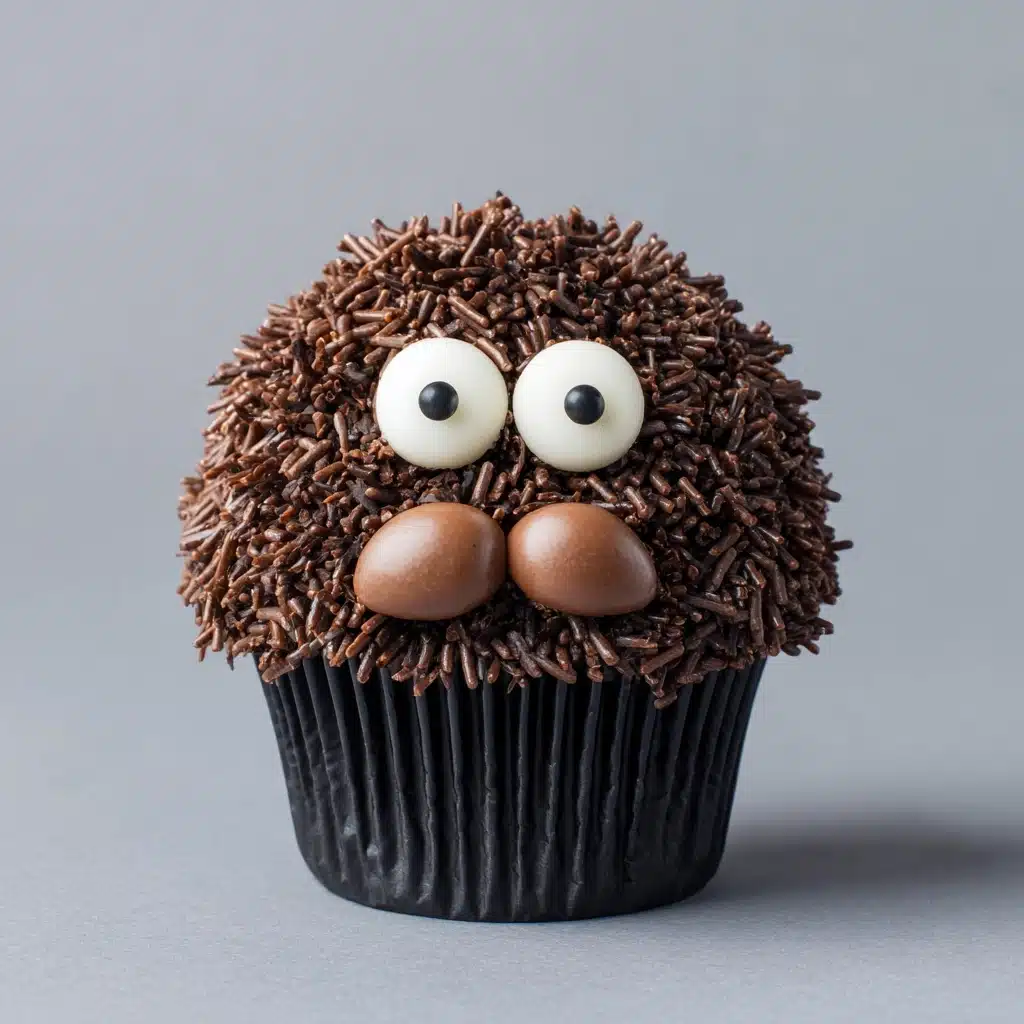
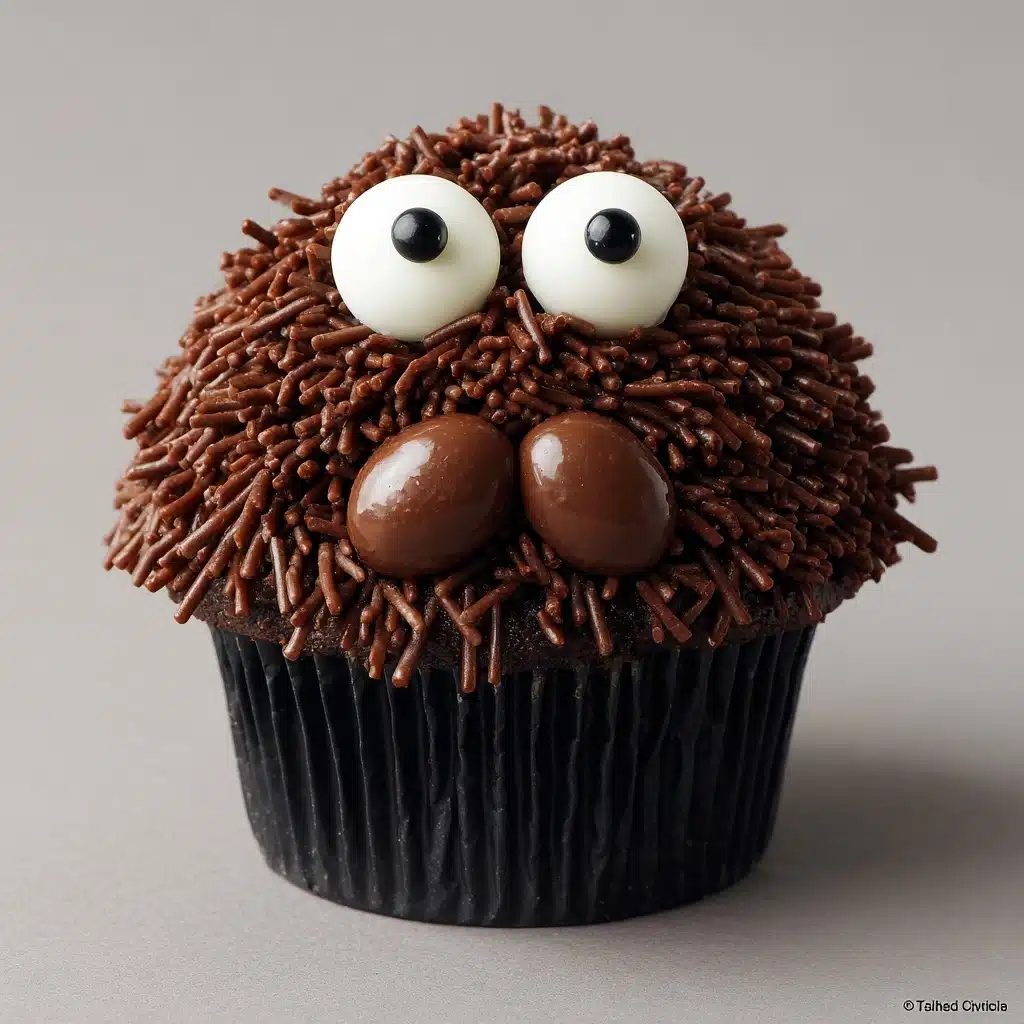
Frost each cupcake with a generous layer of chocolate buttercream. Dip the tops into a plate of crushed chocolate cookies to create that playful “dirt” effect. For each groundhog, press a mini Nilla Wafer halfway into the cupcake for the head, add chocolate chips as ears, and stick on candy eyes. Snip a mini marshmallow in half and position both pieces for the teeth. Finally, use black decorating gel (or a bit of melted chocolate) to draw a tiny nose and a big, cheery groundhog smile. Gather the family and let everyone create their own silly groundhog faces!
How to Serve Groundhog Day Cupcakes
Garnishes
Keep the fun going with extra crushed cookies sprinkled around as “dirt” on the serving platter, or tuck in little sprigs of edible greenery like mint for a fresh, garden-like effect. A dusting of powdered sugar makes the scene look like a frosty February morning—adorably festive!
Side Dishes
These whimsical treats pair well with glasses of cold milk or mugs of hot cocoa on a chilly winter day. If you’re celebrating, offer a platter of fresh strawberries or fruit skewers for a lovely balance and pop of color that won’t compete with your star Groundhog Day Cupcakes.
Creative Ways to Present
Arrange the Groundhog Day Cupcakes on a tray with artificial grass, tiny flags, or paper sun and cloud decorations for a picture-perfect Groundhog Day scene. Cupcake stands add height and let those curious little faces peek out from all angles. For parties, personalize each groundhog with a mini name flag or set out extra decorating supplies so guests can make their own cupcake critters!
Make Ahead and Storage
Storing Leftovers
If you’re lucky enough to have any Groundhog Day Cupcakes left over, store them in an airtight container at room temperature for up to two days. Be sure to keep them out of direct sunlight to prevent the decorations from melting or smudging. The cupcakes stay moist, and the decorations remain crisp and cute!
Freezing
For longer storage, unfrosted cupcakes freeze beautifully. Cool the cupcakes fully, then wrap each one individually in plastic wrap and pop them in a freezer bag for up to three months. Thaw at room temperature before frosting and decorating with all the groundhog trimmings.
Reheating
To freshen up a cupcake, simply let it come to room temperature if chilled or gently warm it for a few seconds in the microwave. Avoid microwaving decorated cupcakes, as candy eyes and chocolate chips may melt. For best results, frost and decorate just before serving if you’re reviving from the freezer.
FAQs
Can I make the Groundhog Day Cupcakes gluten free?
Absolutely! Use your favorite gluten-free all-purpose flour blend in place of regular flour, and double-check that your chocolate cookies and decorations are gluten free as well. Your whimsical cupcakes will be just as tasty and cute!
What’s the best way to crush the chocolate cookies for “dirt”?
The easiest way is to place the cookies in a zip-top bag and crush them with a rolling pin. You want a mix of fine crumbs and a few chunky bits for texture. If you have a food processor, a few quick pulses work great too—just be careful not to turn them into powder!
Can I make the cupcakes or frosting ahead of time?
Yes! You can bake the cupcakes and make the buttercream up to a day in advance. Store cupcakes tightly wrapped at room temperature, and refrigerate the frosting. Bring the buttercream back to room temperature and re-whip it briefly before decorating.
What if I can’t find candy eyes or black decorating gel?
No worries! Mini chocolate chips or black sesame seeds work well for eyes, and a tiny dab of melted chocolate makes an adorable nose and mouth. Get creative—these Groundhog Day Cupcakes are all about having fun with what you have!
Can kids help make these cupcakes?
Absolutely! Kids love building the groundhog faces. Set up a “decorating station” with all the toppings, and let them design their own edible groundhogs. The decorating is even more memorable than the eating, so it’s a fantastic holiday activity for families.
Final Thoughts
There’s nothing quite like sharing a batch of Groundhog Day Cupcakes to brighten up a winter day. With their playful decorations and scrumptious chocolate base, they’re sure to become a favorite tradition, year after year. Give these treats a try and enjoy the smiles they bring to your table!
Print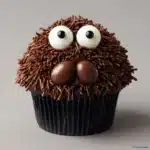
Groundhog Day Cupcakes Recipe
- Total Time: 45 minutes
- Yield: 12 cupcakes 1x
- Diet: Vegetarian
Description
Celebrate Groundhog Day with these adorable and delicious Groundhog Day Cupcakes! These chocolate cupcakes are topped with a chocolate buttercream frosting and decorated to look like cute groundhogs popping out of the ground. A fun and festive treat for the whole family!
Ingredients
Cupcakes:
- 1 ½ cups all-purpose flour
- ½ cup unsweetened cocoa powder
- 1 teaspoon baking soda
- ½ teaspoon salt
- ½ cup unsalted butter (softened)
- 1 cup granulated sugar
- 2 large eggs
- 1 teaspoon vanilla extract
- ¾ cup buttermilk
Chocolate Buttercream:
- ¾ cup unsalted butter (softened)
- 2 ½ cups powdered sugar
- ½ cup unsweetened cocoa powder
- 2–3 tablespoons milk
- 1 teaspoon vanilla extract
Decoration:
- crushed chocolate cookies (for ‘dirt’)
- mini Nilla Wafers
- candy eyes
- chocolate chips
- mini marshmallows
- black decorating gel
Instructions
- Preheat the oven and prepare the muffin tin: Preheat the oven to 350°F and line a 12-cup muffin tin with cupcake liners.
- Prepare the cupcake batter: In a medium bowl, whisk together the flour, cocoa powder, baking soda, and salt. In a large bowl, beat the butter and sugar until light and fluffy. Add the eggs and vanilla, then alternate adding the dry ingredients and buttermilk. Mix until just combined.
- Bake the cupcakes: Fill each cupcake liner about 2/3 full and bake for 18–20 minutes. Let cool completely.
- Make the chocolate buttercream: Beat the butter until creamy. Sift in the powdered sugar and cocoa powder, then add vanilla and milk. Beat until light and fluffy.
- Decorate the cupcakes: Frost each cupcake with the chocolate buttercream and dip the tops in crushed chocolate cookies. Add Nilla Wafers, candy eyes, chocolate chips, marshmallows, and decorating gel to create groundhog faces.
Notes
- Let kids help decorate for a fun activity.
- If no decorating gel, melted chocolate can be used.
- Prep Time: 25 minutes
- Cook Time: 20 minutes
- Category: Dessert
- Method: Baking
- Cuisine: American
Nutrition
- Serving Size: 1 cupcake
- Calories: 410
- Sugar: 36g
- Sodium: 180mg
- Fat: 22g
- Saturated Fat: 13g
- Unsaturated Fat: 8g
- Trans Fat: 0g
- Carbohydrates: 50g
- Fiber: 2g
- Protein: 4g
- Cholesterol: 65mg