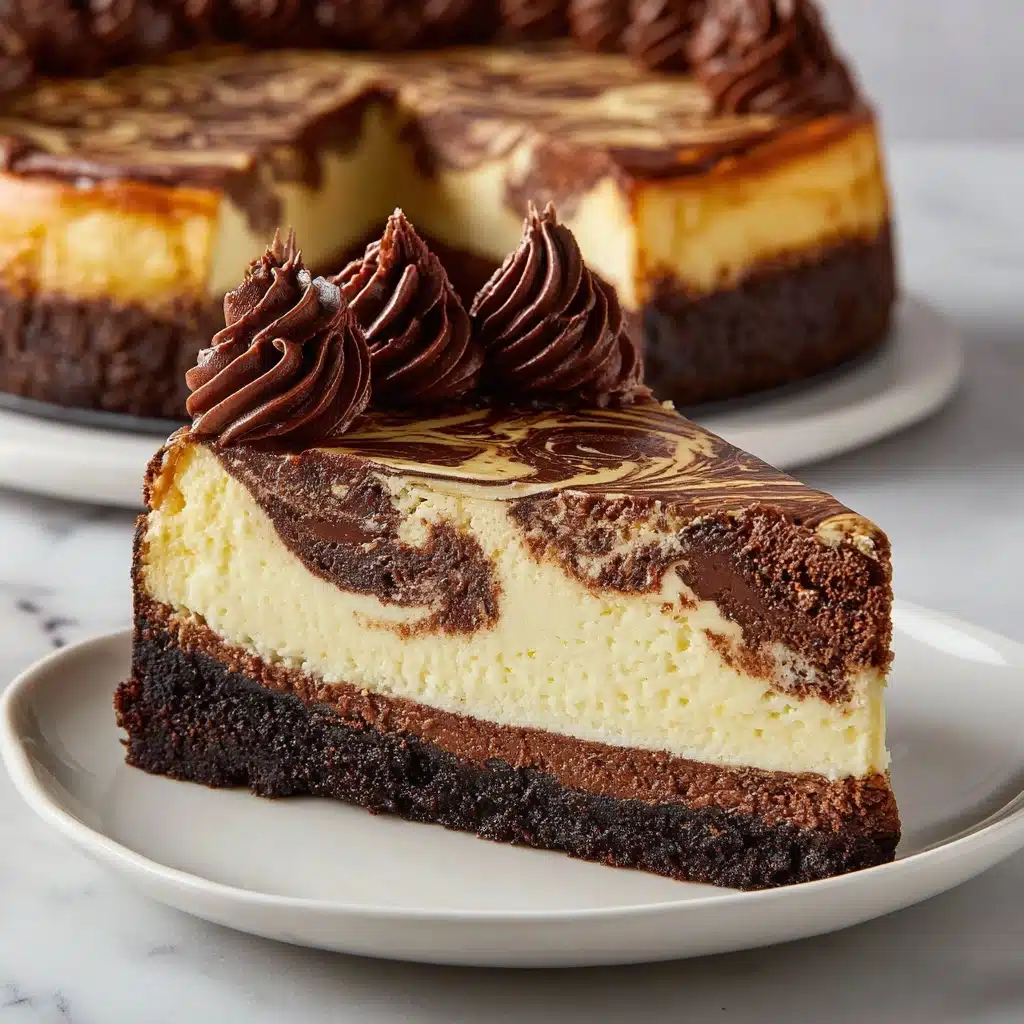
If you’re ready to indulge in the ultimate blend of creamy and chocolatey, Chocolate Marble Cheesecake is a dream dessert you’ll swoon over. Imagine silky-smooth cheesecake with beautiful chocolate swirls gracing each slice, offering both visual wow-factor and decadent flavor. This dessert is perfect for dinner parties, weekend treats, or whenever you want to impress—yet it’s totally doable for home bakers. With its classic, rich taste and eye-catching marbled effect, this is a cheesecake you’ll want to make again and again.
Ingredients You’ll Need
Every ingredient in this Chocolate Marble Cheesecake plays a specific, delicious role: the crust adds that essential crunch, while rich cream cheese and chocolate create a harmonious, marbled masterpiece. Keep it simple—the beauty is in the details and the quality of what you use.
- Graham cracker crumbs (1 1/2 cups): Forms a sturdy, slightly sweet base for our cheesecake to rest on.
- Granulated sugar (1/4 cup for crust, 3/4 cup for filling): Sweetens both the crust and creamy filling, keeping flavors balanced.
- Unsalted butter (6 tablespoons, melted): Binds the crust and adds a rich, buttery note.
- Cream cheese (24 ounces, softened): The heart and soul of any cheesecake—make sure it’s room temperature for unbeatable smoothness.
- Large eggs (3): Give structure and silkiness to the creamy filling.
- Vanilla extract (1 teaspoon): Elevates the flavor with an irresistible nostalgic warmth.
- Sour cream (1/2 cup): Adds lightness and a subtle tang that balances all the richness.
- Heavy cream (1/3 cup): Makes the batter extra luscious and melt-in-your-mouth soft.
- Semi-sweet chocolate (4 ounces, chopped): The secret to those gorgeous, flavorful swirls—spring for the good stuff here!
How to Make Chocolate Marble Cheesecake
Step 1: Prepare the Crust
Start by preheating your oven to 325°F. In a medium-sized mixing bowl, combine the graham cracker crumbs, 1/4 cup of granulated sugar, and the melted butter, making sure all the crumbs get evenly moistened. Pour the mixture into a 9-inch springform pan and press it down firmly—using the bottom of a glass works wonders for evenness. Bake the crust for 10 minutes, then let it cool while you dive into the creamy filling.
Step 2: Whip Up the Cream Cheese Filling
In a large bowl, beat together the softened cream cheese and 3/4 cup granulated sugar until the mixture looks completely smooth and fluffy. Add the eggs, one at a time, blending well after each so your cheesecake stays silky. Stir in the vanilla extract, sour cream, and heavy cream, mixing until everything is fully incorporated and the batter is velvety.
Step 3: Melt the Chocolate
Take your chopped semi-sweet chocolate and melt it in a heatproof bowl. You can do this by microwaving in 30-second intervals (stirring after each), or gently over a double boiler. The chocolate should be smooth and shiny—let it cool for a couple of minutes so it doesn’t seize up your cheesecake batter.
Step 4: Create the Marbled Effect
Measure out 1 cup of your plain cheesecake batter and blend it thoroughly with the melted chocolate. Pour the remaining plain batter onto the cooled crust and smooth out the top. Now for the fun part: Drop spoonfuls of the chocolate batter onto the plain batter, scatter them all over the surface, and use a knife or skewer to gently swirl the two together. Go slowly—a few swirls is all it takes for an elegant marbled look. Over-swirl, and you’ll lose that beautiful pattern!
Step 5: Bake and Cool
Transfer your masterpiece to the oven and bake for 55 to 65 minutes until the edges are set but the center still has a slight jiggle—it will firm up as it cools. Once baked, turn off the oven and crack the door open, leaving the cheesecake inside for an hour. This gradual cooling reduces the risk of cracks. Afterward, refrigerate your Chocolate Marble Cheesecake for at least 4 hours, but overnight is best for perfect slicing.
How to Serve Chocolate Marble Cheesecake

Garnishes
A simple dusting of cocoa powder or a generous dollop of freshly whipped cream really sets off the chocolate marbling. For extra flair, add a few chocolate curls, fresh berries, or even a sprinkle of sea salt right before serving—each garnish brings out a different side of this already stunning dessert.
Side Dishes
Make your Chocolate Marble Cheesecake the star of a dessert spread by serving it alongside bowls of fresh-cut fruit, a raspberry coulis for a tangy contrast, or small glasses of strong coffee or espresso to balance out the richness. You can’t go wrong with a scoop of vanilla bean ice cream on the side, either!
Creative Ways to Present
Serve individual slices with a little extra swirl of melted chocolate across the plate for that restaurant vibe. For parties, you can cut the cheesecake into small squares and skewer them with toothpicks for bite-sized treats. Layered parfait-style in glasses with whipped cream and cookie crumbles is another crowd-pleasing, eye-catching way to present this classic.
Make Ahead and Storage
Storing Leftovers
Keep any leftover Chocolate Marble Cheesecake tightly covered in the refrigerator. It will stay at its luscious best for up to five days. To prevent the slices from drying out or picking up fridge odors, press a piece of plastic wrap or wax paper directly against the exposed sides.
Freezing
Want to save your cheesecake for a special occasion (or emergency chocolate cravings)? Wrap individual slices or the whole cheesecake tightly in plastic wrap, then foil, and freeze for up to two months. Thaw overnight in the refrigerator for the best flavor and texture. The marbled pattern stays gorgeous, even after freezing!
Reheating
While you don’t technically reheat cheesecake, you can bring refrigerated or thawed slices to room temperature for 30 minutes before serving to revive the creamy texture. Avoid microwaving, which can cause the cheesecake to become rubbery or unevenly warm.
FAQs
Can I use milk chocolate instead of semi-sweet chocolate for the marbled effect?
Absolutely! Milk chocolate will create a sweeter, milder swirl, while semi-sweet chocolate gives a more pronounced cocoa flavor. Both taste delicious, so choose whichever suits your preference or what you have on hand.
Do I need a water bath when baking Chocolate Marble Cheesecake?
While a water bath can help prevent cracks by creating gentle, even heat, it isn’t strictly necessary for this recipe. Letting the cheesecake cool gradually in the oven works wonders to minimize cracking, so you can skip the fuss if you like.
How do I get those perfect, clean slices?
For picture-perfect slices, dip a sharp knife in hot water and wipe it dry before every cut. This melts through the creamy layers and keeps each piece neat—with every mesmerizing swirl on full display!
Can I make Chocolate Marble Cheesecake in advance?
Definitely! In fact, the flavor improves as it chills, making it the perfect make-ahead dessert for gatherings or busy weekends. Store in the fridge overnight, then slice and serve when ready.
What’s the best way to melt chocolate for the swirl?
The microwave is fast and effective; just go in short bursts and stir often so the chocolate doesn’t burn. Or, melt it gently over a double boiler for a classic, foolproof method—just be sure it’s smooth and cooled so your swirl is flawless.
Final Thoughts
There’s something magical about pulling off a Chocolate Marble Cheesecake—watching those swirls appear and knowing each slice will dazzle and delight. Don’t wait for a special occasion; treat yourself and your loved ones to this gorgeous, classic dessert soon. It just might become your new go-to recipe!
Print
Chocolate Marble Cheesecake Recipe
- Total Time: 5 hours 25 minutes
- Yield: 12 servings 1x
- Diet: Non-Vegetarian
Description
Indulge in the rich flavors of this decadent Chocolate Marble Cheesecake. A creamy and luscious dessert that combines the best of both worlds with a velvety smooth cheesecake swirled with rich chocolate for the perfect balance of flavors.
Ingredients
Graham Cracker Crust:
- 1 1/2 cups graham cracker crumbs
- 1/4 cup granulated sugar
- 6 tablespoons unsalted butter, melted
Cheesecake Filling:
- 24 ounces cream cheese, softened
- 3/4 cup granulated sugar
- 3 large eggs
- 1 teaspoon vanilla extract
- 1/2 cup sour cream
- 1/3 cup heavy cream
Chocolate Swirl:
- 4 ounces semi-sweet chocolate, chopped
Instructions
- Preheat the Oven: Preheat oven to 325°F. Prepare the crust by combining graham cracker crumbs, sugar, and melted butter. Press into a 9-inch springform pan and bake for 10 minutes.
- Prepare the Cheesecake Filling: Beat cream cheese and sugar until smooth. Add eggs one at a time, then mix in vanilla, sour cream, and heavy cream.
- Make the Chocolate Swirl: Melt the chopped chocolate and combine with a portion of the cheesecake batter.
- Assemble and Bake: Pour plain batter into the crust, then add spoonfuls of the chocolate batter. Swirl gently and bake for 55–65 minutes.
- Cool and Chill: Let the cheesecake cool in the oven, then refrigerate for at least 4 hours before serving.
Notes
- Use high-quality chocolate for best results.
- Swirl gently for a beautiful marbled effect.
- Enhance presentation with whipped cream or cocoa powder.
- Prep Time: 25 minutes
- Cook Time: 60 minutes
- Category: Dessert
- Method: Baking
- Cuisine: American
Nutrition
- Serving Size: 1 slice
- Calories: 450
- Sugar: 29 g
- Sodium: 270 mg
- Fat: 31 g
- Saturated Fat: 18 g
- Unsaturated Fat: 12 g
- Trans Fat: 0 g
- Carbohydrates: 34 g
- Fiber: 1 g
- Protein: 8 g
- Cholesterol: 125 mg