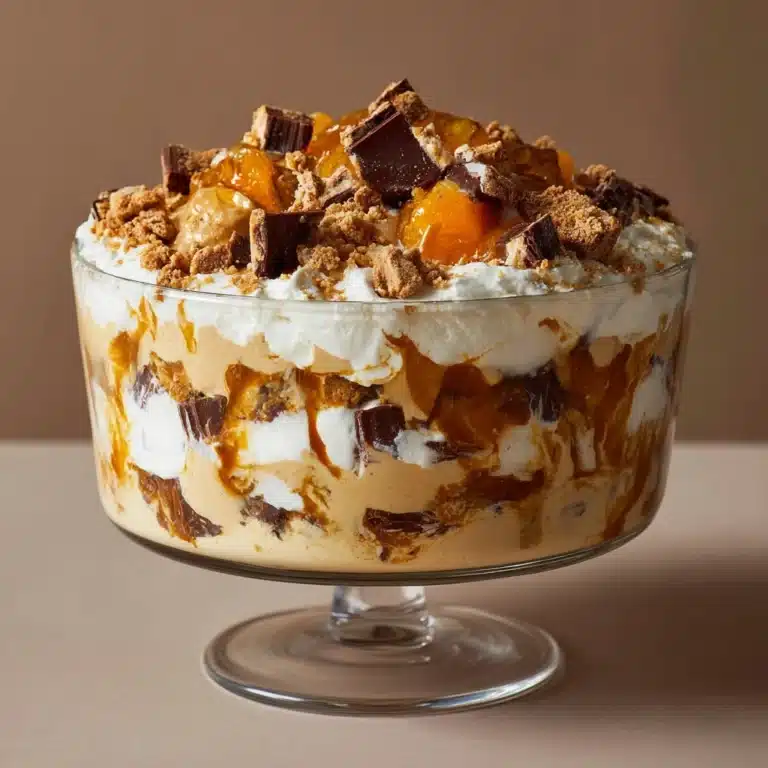
If you’re dreaming of a dessert that’s rich, creamy, and incredibly easy to put together, then this Brownie Refrigerator Cake Recipe is exactly what you need in your life. Imagine a fudgy brownie base layered with luscious cream cheese frosting, topped with a dreamy chocolate-vanilla pudding mixture, and crowned with fluffy whipped topping and decadent chocolate—it’s a no-bake marvel that tastes like it took hours to create. Perfect for parties, weeknight treats, or anytime you crave a slice of pure indulgence, this dessert will quickly become your go-to showstopper.

Ingredients You’ll Need
Each ingredient in this Brownie Refrigerator Cake Recipe plays a crucial role in creating that perfect balance of texture and flavor, bringing together familiar comforts with a twist of creamy delight. The list is simple but mighty, ensuring that every bite gives you that ideal harmony of sweetness and richness.
- Brownie mix: A convenient base that provides a fudgy, chocolatey foundation without any fuss.
- Extra-large egg: Helps bind the brownie mix and guarantees moist, tender brownies.
- Cream cheese: Adds tangy creaminess that balances the sweetness beautifully.
- Powdered sugar: Sweetens the cream cheese layer with a smooth finish.
- Whipped topping (two 8 oz. containers): Provides airy lightness in both the cream cheese and pudding layers.
- Instant chocolate pudding mix: Intensifies the chocolate flavor with a silky texture.
- Instant vanilla pudding mix: Softens the chocolate punch while adding a creamy vanilla note.
- Milk: Brings the puddings together into a luscious, thick layer.
- Hershey bar (grated) or chocolate syrup: Adds the perfect finishing touch with a rich chocolatey crunch or drizzle.
How to Make Brownie Refrigerator Cake Recipe
Step 1: Prepare the Brownie Base
Start by preheating your oven as directed on the brownie mix package. Follow the instructions carefully, using an extra-large egg to make sure your brownies are just right—moist, chewy, and perfectly dense. Bake the batter in a 9×13-inch pan and let it cool fully; this is key to creating a stable base for your decadent layers ahead.
Step 2: Make the Cream Cheese Layer
Once your brownies are completely cooled, it’s time to whip up the cream cheese layer. Beat together softened cream cheese and powdered sugar until the mixture is smooth and silky. Then, fold in one container of the whipped topping gently—this keeps the layer light and luscious. Spread this creamy mixture evenly over the brownie layer, forming a velvety frosting that perfectly complements the chocolate beneath.
Step 3: Prepare the Pudding Layer
Next, grab a bowl and combine the chocolate pudding mix, vanilla pudding mix, and milk. Whisk them together until the pudding thickens to the perfect consistency, then let it rest for five minutes to set. Spread this rich, dreamy pudding mixture over the cream cheese layer, adding that decadent flavor burst your taste buds crave.
Step 4: Final Layer & Garnish
The grand finale is the second container of whipped topping, spread generously on top of the pudding layer for a light, fluffy finish. For that extra wow factor, sprinkle grated Hershey’s chocolate or drizzle some chocolate syrup over it—the perfect texture and flavor contrast to make each bite irresistible.
Step 5: Chill & Serve
Cover your masterpiece and refrigerate for at least four hours, but overnight is even better. Chilling allows the layers to set beautifully and the flavors to meld. When it’s slicing time, cut into generous squares and serve chilled—pure bliss on a plate!
How to Serve Brownie Refrigerator Cake Recipe

Garnishes
Adding a little extra flourish is simple and delightful. Consider topping your Brownie Refrigerator Cake Recipe with fresh berries for a pop of color and brightness, or a sprinkle of chopped nuts for some crunch. A dusting of cocoa powder or a few mint leaves can also elevate the presentation and flavor profile effortlessly.
Side Dishes
Pair this dessert with a scoop of vanilla ice cream or a dollop of freshly whipped cream to complement its creamy texture. A hot cup of coffee or a glass of cold milk can also balance the richness beautifully and round out your dessert experience.
Creative Ways to Present
For special occasions, consider serving the cake in individual glass parfait cups layered for a stylish individual treat. Alternatively, you can cut the brownies into bite-sized squares and serve them on a dessert platter with toothpicks—perfect for sharing at parties. Adding edible flowers or colorful sprinkles also makes your dessert an eye-catcher.
Make Ahead and Storage
Storing Leftovers
This cake keeps wonderfully in the refrigerator for up to 3 days. Cover it tightly with plastic wrap or store it in an airtight container to maintain its moisture and freshness. The flavors even become more harmonious after a day, making snippets of indulgence last longer.
Freezing
You can freeze the Brownie Refrigerator Cake Recipe for up to one month. Place it in an airtight container or wrap it well in plastic wrap and foil to prevent freezer burn. When you’re ready to enjoy, thaw it overnight in the fridge to preserve its creamy layers.
Reheating
This dessert is best enjoyed chilled, so reheating is generally not recommended. However, if you prefer a slightly softer texture, allow it to come to room temperature before serving, which enhances the creamy mouthfeel without losing its structure.
FAQs
Can I use homemade brownies instead of a box mix?
Absolutely! Homemade brownies work wonderfully and add a personal touch. Just ensure they cool completely before layering to keep the cream cheese from melting.
Is it possible to make this dessert dairy-free?
Yes! Substitute dairy products like cream cheese, whipped topping, and milk with plant-based alternatives such as vegan cream cheese, coconut whipped cream, and almond or oat milk to make this a dairy-free delight.
Can I prepare this cake without the pudding mixes?
While pudding mixes add convenience and texture, you can make your own pudding layer from scratch using cocoa, sugar, cornstarch, and milk. However, it will require additional cooking and chilling time.
What’s the best way to cut this cake cleanly?
Use a sharp knife dipped in hot water and wiped dry before each cut. This prevents sticking and helps you slice through the layers smoothly for neat pieces.
Can I add other flavors to the pudding layer?
Definitely! Feel free to experiment by using different pudding flavors like butterscotch or banana to give your Brownie Refrigerator Cake Recipe a unique twist that suits your taste buds.
Final Thoughts
This Brownie Refrigerator Cake Recipe is a true gem for anyone craving a show-stopping dessert without tons of hassle. Its rich layers and luscious textures come together so effortlessly, making it a guaranteed crowd-pleaser for any occasion. I can’t wait for you to try it and enjoy every delicious bite—trust me, you’re going to love it!
Print
Brownie Refrigerator Cake Recipe
- Total Time: 4 hours 45 minutes
- Yield: 12 to 16 servings 1x
Description
A luscious Brownie Refrigerator Cake featuring a rich brownie base topped with creamy layers of sweetened cream cheese, fluffy whipped topping, and a luscious pudding blend, finished with a chocolate garnish. This no-bake layered dessert is perfect for gatherings and can be made ahead for a chilled, indulgent treat.
Ingredients
For the Brownie Layer:
- 1 box brownie mix (prepared according to package instructions)
- 1 extra-large egg (or as required by brownie mix)
For the Cream Cheese Layer:
- 1 (8 oz.) package cream cheese, softened
- 1 cup powdered sugar
- 1 (8 oz.) container whipped topping
For the Pudding Layer:
- 1 (3 oz.) package instant chocolate pudding
- 1 (3 oz.) package instant vanilla pudding
- 3 ½ cups milk
- 1 (8 oz.) container whipped topping
For Topping:
- 1 Hershey bar (grated) or chocolate syrup for drizzling
Instructions
- Prepare the Brownie Base: Preheat the oven as instructed on the brownie mix package. Prepare the brownie batter by combining the mix and an extra-large egg according to the package directions. Pour the batter into a greased 9×13-inch pan and bake until fully cooked. Remove from the oven and allow the brownies to cool completely before proceeding.
- Make the Cream Cheese Layer: In a mixing bowl, beat the softened cream cheese and powdered sugar together until smooth and creamy. Gently fold in one 8 oz. container of whipped topping until evenly combined. Spread this mixture evenly over the cooled brownie layer to form a smooth blanket.
- Prepare the Pudding Layer: In a separate bowl, whisk together the instant chocolate pudding, instant vanilla pudding, and 3 ½ cups of milk until the mixture thickens, about 2 minutes. Let it sit for 5 minutes to further set. Then, spread this pudding mixture evenly over the cream cheese layer.
- Final Layer & Garnish: Spread the remaining 8 oz. container of whipped topping over the pudding layer to create a fluffy top layer. Garnish the cake by sprinkling grated Hershey’s chocolate over the top or drizzling with chocolate syrup for an attractive finish.
- Chill & Serve: Cover the assembled cake and refrigerate it for at least 4 hours, ideally overnight, to allow the layers to set and flavors to meld. Slice into 12 to 16 servings and serve chilled for best taste and texture.
Notes
- Ensure the brownies are completely cooled before adding the cream cheese layer to prevent melting or mixing of layers.
- For a quicker set, you can use cold milk when preparing the pudding, but allow sufficient time to chill the cake afterwards.
- The cake can be garnished with nuts or fresh berries as an alternative topping.
- Store leftovers covered in the refrigerator for up to 3 days to maintain freshness.
- This dessert is best served chilled and does not require baking beyond the brownie base.
- Prep Time: 15 minutes
- Cook Time: 30 minutes
- Category: Dessert
- Method: Baking
- Cuisine: American