If you’re looking for a show-stopping dessert that combines rich, creamy cheesecake with the mischievous spirit of everyone’s favorite cookie-loving blue monster, this Cookie Monster Cheesecake Recipe has your name written all over it. You get a buttery Oreo crust, a vibrant blue cheesecake speckled with chunks of cookies and mini chocolate chips, and adorable toppings that make every slice irresistible. This playful treat is a guaranteed hit for birthdays, bake sales, or any moment when only the most fun, crowd-pleasing dessert will do.
Ingredients You’ll Need
Gathering your ingredients for the Cookie Monster Cheesecake Recipe couldn’t be easier, and each one brings something special—creamy richness, crunch, sweetness, or that iconic blue color! Here’s what you’ll need, along with quick tips to make every layer delectable.
- Chocolate sandwich cookies (like Oreos): The secret to a deeply chocolatey, sturdy crust that holds all that cheesecake goodness.
- Melted butter: Binds your crust crumbs together and adds a golden, toasty flavor.
- Cream cheese (softened): For that ultra-creamy, classic cheesecake filling. Using softened blocks ensures the smoothest texture.
- Granulated sugar: Brings sweetness to balance the tang of the cream cheese.
- Large eggs: Give the cheesecake its rich structure and silkiness.
- Sour cream: Adds delicious tang and keeps the filling wonderfully moist.
- Vanilla extract: Rounds out the flavors with a subtle warmth.
- Blue gel food coloring: Essential for that bold Cookie Monster blue—gel keeps your batter thick and intensely colored!
- Mini chocolate chips: Evenly dispersed chocolate in every bite for pops of texture and flavor.
- Chopped chocolate chip cookies: For lots of chunky cookie surprises mixed right into the cheesecake and on top.
- Chopped chocolate sandwich cookies: More cookie pieces to amp up the fun and crunch.
- Whipped cream and extra cookies: Optional (but highly recommended!) for decorating and giving your cheesecake that festive Cookie Monster flair.
How to Make Cookie Monster Cheesecake Recipe
Step 1: Prepare the Cookie Crust
Start by preheating your oven to 325°F. In a food processor, pulse your chocolate sandwich cookies until they’re as fine as beach sand, then stir in the melted butter. Press this chocolatey mixture firmly into the bottom of a 9-inch springform pan—you want it packed tight so every slice stays beautiful. Bake for 8 minutes; this helps the crust set and gives it an irresistible crunch. Let it cool while you work on the luscious filling.
Step 2: Make the Cheesecake Filling
In a large bowl, beat together the softened cream cheese and granulated sugar until silky and smooth. Add the eggs, one by one, mixing thoroughly after each to avoid lumps. Stir in the sour cream and vanilla extract. Now for the magic: blend in several drops of blue gel food coloring (add it gradually!) until you have that iconic Cookie Monster color. This step is seriously fun—perfect for letting little ones help out, too.
Step 3: Add Cookies and Chips
Fold in the mini chocolate chips, 1 cup of chopped chocolate chip cookies, and 1/2 cup chopped chocolate sandwich cookies. Be gentle so you don’t lose all the air you just whipped in, but make sure there’s plenty of chunky goodness throughout your batter.
Step 4: Assemble and Bake
Pour your vibrantly blue, cookie-flecked batter over the cooled crust. Smooth the top with a spatula, then bake in the center of the oven for 55 to 65 minutes. You’re looking for a cheesecake that’s set at the edges with a slightly wobbly center—trust me, that wobble is perfection! Turn off the oven, crack the door, and let the cheesecake cool inside for about an hour; slow cooling means no unsightly cracks.
Step 5: Chill and Decorate
Once cooled to room temperature, move your cheesecake to the refrigerator and let it chill for at least 4 hours, but overnight is even better for flavor and texture. When ready to serve, pile on the whipped cream, sprinkle with extra mini cookies, and finish with a dusting of cookie crumbs. The more playful the presentation, the more everyone will love it!
How to Serve Cookie Monster Cheesecake Recipe
Garnishes
Think big and bold when garnishing! A generous swirl of whipped cream, a sprinkle of mini chocolate chips, and a scattering of both chocolate chip cookies and Oreo crumbs make each slice a true Cookie Monster Cheesecake Recipe masterpiece. Want extra fun? Press a whole mini cookie or two upright into each slice before serving.
Side Dishes
Cheesecake is rich enough to steal the show, but you can balance your Cookie Monster Cheesecake Recipe with light, fruity sides. Slices of fresh strawberries, a bowl of blueberries, or even a simple fruit salad provide a refreshing contrast to the decadent dessert.
Creative Ways to Present
Get playful! Serve individual mini cheesecakes in mason jars for parties, create a “Cookie Monster Bar” with toppings for DIY decorating, or add candy googly eyes for an extra monster-y touch. Cupcake liners also make for perfect portable (and adorable) servings.
Make Ahead and Storage
Storing Leftovers
Your Cookie Monster Cheesecake Recipe keeps beautifully in the fridge! Just cover the pan or wrap individual slices in plastic wrap, and they’ll stay fresh for up to 5 days. The crust holds up well, and the cookie pieces keep their texture.
Freezing
Need to make it further ahead? You can freeze the whole cheesecake (undecorated works best) or individual slices. Wrap tightly in plastic and then foil; freeze for up to 2 months. Thaw overnight in the fridge before serving and decorate fresh for best results.
Reheating
Cheesecake is best served chilled or at room temperature. If you’d like a softer bite, let slices sit out for 20 minutes before serving—the rich flavors shine even more. No need to heat; just enjoy straight from the fridge!
FAQs
How do I avoid cracks in my cheesecake?
Let your cheesecake cool slowly in the oven with the door cracked after baking. This gradual temperature change prevents cracks and keeps your Cookie Monster Cheesecake Recipe perfectly smooth.
Do I have to use a springform pan?
While a springform pan makes serving super easy, you can use a deep round cake pan lined with high parchment paper for easy lifting. A springform, though, really does give you those perfect sides!
Can I use another type Dessert
Absolutely! Any crunchy chocolate-based cookie will work. You can get creative with chocolate graham crackers or even chocolate chip cookies for a different twist on the Cookie Monster Cheesecake Recipe.
How much blue gel food coloring should I use?
Start with a few drops, and add more until you reach your desired blue. Gel is concentrated, so a little goes a long way—you want the batter to be vibrant but not overly colored.
Can I make this recipe gluten-free?
Yes! Simply swap in your favorite gluten-free chocolate sandwich cookies and chocolate chip cookies for a gluten-free Cookie Monster Cheesecake Recipe everyone can enjoy.
Final Thoughts
If you love cheesecake, cookies, and playful desserts that make everyone smile, there’s no better place to start than this Cookie Monster Cheesecake Recipe. It’s truly a labor of love that pays off with every bright, cookie-packed slice. Gather your ingredients and enjoy every delicious blue bite—you’re about to become a dessert legend with friends and family!
Print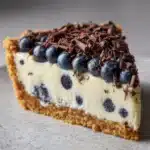
Cookie Monster Cheesecake Recipe
- Total Time: 6 hours
- Yield: 12 servings 1x
- Diet: Vegetarian
Description
Indulge in this whimsical Cookie Monster Cheesecake, a delightful twist on the classic dessert. Creamy cheesecake with a vibrant blue hue and loaded with chocolate chips and cookie chunks, topped with whipped cream and cookie crumbs for a fun and delicious treat.
Ingredients
Cookies Crust:
- 24 chocolate sandwich cookies (like Oreos)
- 4 tablespoons melted butter
Cheesecake Filling:
- 3 (8 oz) packages cream cheese, softened
- 1 cup granulated sugar
- 3 large eggs
- 1/2 cup sour cream
- 1 teaspoon vanilla extract
- Blue gel food coloring
- 1/2 cup mini chocolate chips
- 1 cup chopped chocolate chip cookies
- 1/2 cup chopped chocolate sandwich cookies
Topping:
- Whipped cream
- Extra cookies for garnish
Instructions
- Preheat the oven: Preheat to 325°F. Crush cookies, mix with butter, press into pan, and bake the crust.
- Make filling: Beat cream cheese and sugar, add eggs, sour cream, vanilla, and food coloring. Fold in chips and cookies.
- Bake: Pour filling over crust, bake until set. Cool, then chill.
- Decorate: Top with whipped cream, cookies, and crumbs before serving.
Notes
- Use gel food coloring for best results.
- Wipe knife between cuts for clean slices.
- Cheesecake can be made ahead up to 2 days.
- Prep Time: 20 minutes
- Cook Time: 1 hour
- Category: Dessert
- Method: Baking
- Cuisine: American
Nutrition
- Serving Size: 1 slice
- Calories: 510
- Sugar: 34g
- Sodium: 320mg
- Fat: 35g
- Saturated Fat: 20g
- Unsaturated Fat: 12g
- Trans Fat: 0g
- Carbohydrates: 42g
- Fiber: 1g
- Protein: 6g
- Cholesterol: 115mg